3D TOOLS
GAME DESIGNER
TERMINOLOGY
CONCEPT ART - Used to convey ideas for various media, such as in films, video games, and animations, before they are developed into final products.
STORYBOARDING - Visual representation that organises a sequence of illustrations or images to pre-visualise a motion picture or animation.
MODELLING - The process of creating a 3-dimensional representation of an object or surface using computer software.
RIGGING - The process of creating an invisible skeleton or bone structure for a 3D model.
ANIMATION - Creating moving images by bringing characters and objects to life.
TEXTURING - The process of adding surface detail and colour to 3D models.
RENDERING - The process if converting 3D models into 2D images or animations.

Concept Art for Persona 3 Portable by Shigenori Soejima

Rendered Gameplay from Metaphor: ReFantazio

3D Model for Honkai: Star Rail

Character Storyboard for Mob Psycho 100
3D TOOLS
VERTEX - A vertex is a point where three or more edges meet
EDGES - A line segment where two faces meet
TRIS - A triangle (tri) is a simple polygon consisting of three edges. Often used in real-time rendering due to their ability to create planar surfaces.
POLYS - Poly refers to polygon. Polygons are connected to form a mesh, which is the surface of a 3D model.
PLANAR SURFACE - A flat, two-dimensional surface that extends infinitely in all directions within a three-dimensional space.
N-GONS - An N-gon is a polygon with more than four vertices. They are beneficial in flat surfaces where no deformation or subdivision is required.
NON-EUCLIDEAN POLYGONS - Shapes that deviate from the traditional Euclidean geometry.
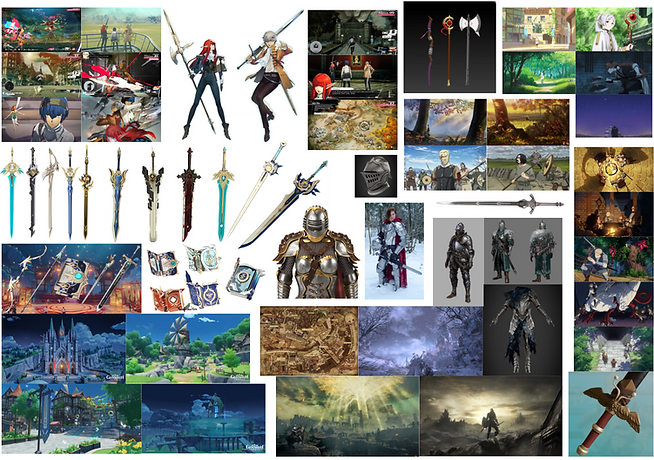
Moodboard for my project
INTRO- FIXING MR. ROBOT
Task where I had to move, rotate and rearrange a 'broken' model in order for it to look identical the established correct one.

Resizing and moving the broken leg to the correct position. I use the arrows to move the leg across the X-axis smoothly.

Here I compare the correct leg with the broken one to get the size as accurate as possible.

I rotate the broken arm to match the other side, then move it up to the correct position.

Rotating the mouth, but due to slight clipping I bring it forward slightly too.

Here I am using the reference model to rotate the eyebrows correctly.

I start experimenting by posing the model in various ways
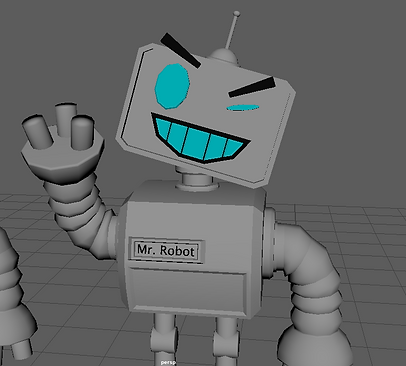
I select the faces on the right eye and pull them together, making it look like the robot is winking.
TEXTURE MAPS
TEXTURE MAPS - When 2D images are projected onto 3D models, adding visual detail.
ALBEDO/COLOUR MAPS - The representation of colour in a three-dimensional space.
AMBIENT OCCLUSION MAPS - Grayscale maps that simulate the darkening of surfaces due to the occlusion of ambient light.
NORMAL MAPS - Simulates the way light interacts with a surface, creating depth and detail.
HEIGHT MAPS - Similar to normal maps, but instead of faking bumps and dips, height maps will tessellate your mesh and actually add the data.
METALLIC MAPS - Grayscale maps that define metallic surfaces on a model.
ROUGHNESS MAPS - Define how light is scattered across the surface of a model.
OPACITY - Makes parts of your material transparent
REFRACTION - Defines how light bends when passing through a solid, liquid or gas.
SELF-ILLUMINATION/EMISSIVE - Used to make materials seemingly emit their own light so they are still visible in dark areas.

INTRO- ADDING TEXTURES
Adding Texture maps in Maya. Model used = Catherine

Select full model, hold down right click, pressing 'Assign New Material'>New Material>Lambert.


Hypershade Icon
Output Connection
Rename the lambert to 'Catherine', and open Hypershade from the top. If files don't show up, press 'Output Connection'. Select Catherine lambert from top, then drag and drop base colour map.


Textured Icon
If colour does not show up on model, press 'Textured' Icon. Afterwards, select only the jewellery on the 3D model.
Name the new lambert 'Jewellery'. Drag both transparency and colour files into hypershade, plugging 'Out Colour' into their correct positions. E.g. 'Out Colour' on the opacity map will plug into 'Transparency'.

Jewellery model will be inverted. Select it, scroll down to 'Effects', and select 'Invert'.
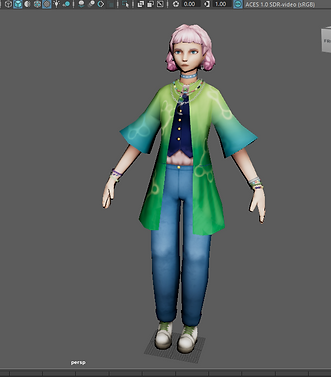
Finished textured model.

Experimenting with 3D substance painter, by applying various textures and colours onto the uploaded 3D model.
WORKFLOWS & TECHNIQUES
LOW TO HIGH POLYGON WORKFLOW - involves starting with a low poly base mesh, which is then unwrapped and built from there. This process allows for a smoother and more efficient model that can be used in various applications such as game development.
SAVING OFTEN- In programmes such as Maya or Blender, saving frequently is incredibly important due to the software's tendency to crash suddenly, which would lose all unsaved progress.
USING REFERENCES - A reference is a visual guide or inspiration that artists use to achieve accuracy, inspiration and develop their skills.
MAINTAINING GOOD TOPOLOGY - The arrangement of vertices, edges and faces that define the shape of the model. It is necessary for creating models that look good and function well, since it affects how the model interacts with light and textures, and how it deforms during animation.
PIPELINES- A structured approach to generating and developing creative ideas in an organized manner.
HIGH TO LOW POLYGON WORKFLOW - Some artists prefer creating their assets by starting with high-poly sculpts. High polygon models can contain a lot more detail than low poly models. Sculpts can be rendered as an image, but must be retopologised before use in games or animation, since the topology is not workable or optimised.
RETOPOLOGY - The process of re-creating or optimizing the mesh structure of a 3D model.

SUBDIVISIONS AND SMOOTHING
SMOOTHING - The process of refining the surface quality of a 3D model to enhance its appearance by removing sharp edges. In Maya, this can be done with the multi-cut tool and subdividing the model.
SUBDIVISIONS- Increasing the polygon count of a 3D model (the number of faces) while maintaining its original shape.
TEXTURE BAKING - Transferring detail from a high-poly model to a low-poly model, optimizing the workflow for real-time applications such as gaming.


Under Poly Modeling, add cube to scene, making sure it's selected in object mode.


Duplicate the model with Ctrl+C (Copy) then Ctrl+V to paste. Move the cube so that both are clearly visible. On the second cube, select the multi-cut tool, and while holding down Ctrl, section off the edges with space remaining. More space means smoother edges later.

After successfully subdividing, change your model to object mode. Then, under 'Mesh' select Smooth. Then, you can adjust dimension levels accordingly. On my cube, I only did 1 level. Depending on how spaced you splice the object relative to the edge, you can create smoother results. Subdivisions add faces to the model while maintaining it's original shape.


Here you can see the difference with smoothing. The left one has two subdivisions, where as the middle only has one.

TEXTURE BAKING


After creating a basic low poly and high poly mesh in maya (base cube mesh & cube mesh with subdivisions and smoothing), open Adobe Substance Painter. In 'New Project', select your low poly mesh next to File. The original models in Maya need to be set origin point 0 in order to successfully texture bake.

After pressing Ok, at the top left under Mode, select 'Bake Mesh Maps'.


Then, press 'Bake selected textures', and you're done.
Under the high-poly section, choose the file icon and find and select your high-poly model. On the right you will be able to check whether the two models are aligned properly. If one of them is too small and causes clipping, adjust the sliders; 'Max Frontal Distance' and 'Max Rear Difference' until there are no such issues.
WARRIOR'S WEAPON- MOODBOARD + SKETCHES


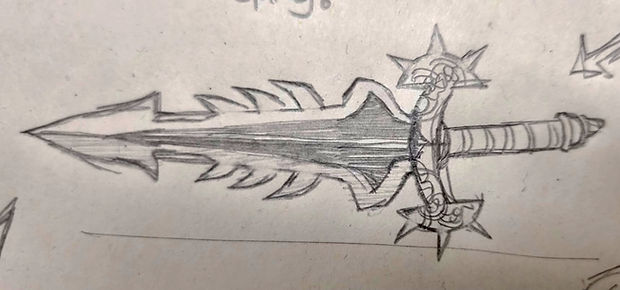
Chosen Design
Initial sketches, experimenting with different designs.
Initial 3D model mesh


2nd 3D model
Whilst creating the model, at some point I made a mistake with the mesh that I wasn't able to fix. It made the inside of the sword bumpy at the top, making it look quite weird.


This model was created with a different technique, leading to much more polygons but a more accurate depiction of the concept art.
LET'S PLAY!
FEEL FREE TO CONTACT ME FOR FUTURE WORK AND PARTNERSHIPS